Cream Blush Belongs on the Cheekbone, Not the Apples
Every tutorial says smile and dot blush on the apples. That single instruction drags the face downward. Here is where cream blush actually wants to sit.
The most repeated piece of makeup advice on YouTube is wrong for most faces.
Smile and dot on the apples. It runs through every beginner tutorial from the Pixiwoo sisters’ early 2010s catalogue through Lisa Eldridge’s recent ones, and across the entire e.l.f. and Charlotte Tilbury how-to library. The instruction is well meant. It is also, for cream and liquid formulas, the wrong placement on at least three quarters of the faces I have made up in fifteen years of editorial work.
One r/MakeupAddiction thread put it cleanly last year. “I’ve been doing it wrong for years because every tutorial told me to smile, but smiling is exactly what moved the colour to the wrong spot.” The post got 2,400 upvotes. The comments under it read like a confession booth.
Here is what is happening anatomically.
What “smile and dot” does to your face
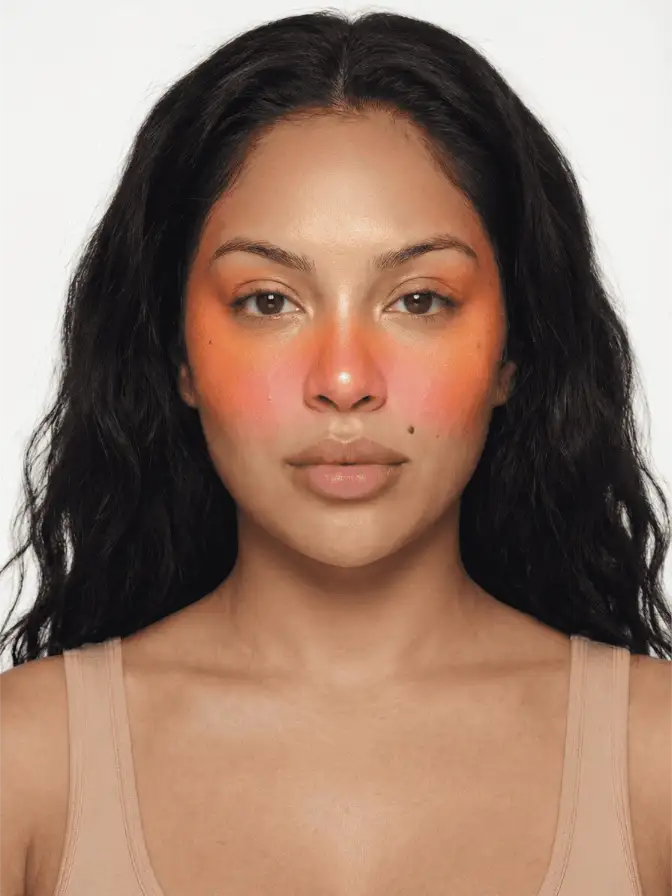
When you smile, the zygomaticus major and the levator labii muscles pull your cheek tissue up and forward. The apple of your cheek temporarily rises an inch or so. If you place colour on that lifted apple and then your face relaxes back to neutral, the pigment lands lower than where you put it. The cluster of colour ends up sitting near the nasolabial fold, closer to the centre of your face, away from the cheekbone.
On a long face that drop is forgiving. On a round, heart-shaped, or square face it pulls the eye toward the middle and reads as width. On anyone over thirty-five whose cheekbones have softened, it adds visual heaviness exactly where you do not want it. The blush starts reading like a fever rather than a flush.
There is also a pigment-physics issue. Cream blush, in a Rare Beauty Soft Pinch wand or a Westman Atelier Baby Cheeks stick, is a wax-and-oil emulsion. Once it touches warm skin, the wax begins to set. You have maybe ninety seconds to blend before the structure locks. Placing it on a smiling face means it sets while the muscle is engaged, and a portion of the pigment migrates into the fine creases that form when you smile. Those creases become subtle dark lines after the wax sets. They read as tired skin under camera light.
The cheekbone-up rule
Here is the alternative. Look at your face neutral, not smiling. Find the underside of your eye socket with one fingertip. Move a finger-width down and back toward your ear. You will feel the upper edge of the zygomatic bone, the ridge that runs diagonally from your nose to your temple. That ridge is where cream wants to sit.
Place the colour as three small dots: one above the apple, one mid-cheekbone, one toward the temple. Then sweep upward and outward with the pad of your ring finger. Not the index. The ring finger applies less pressure and produces a softer edge. The motion is short, repeated taps, not dragging.
What you should see is a diagonal line of colour that follows the bone, lifting from the outer nostril toward the hairline. The intensity is heaviest in the middle of the cheekbone, fading at both ends.
That diagonal does two things. First, it visually pulls the face up and out, because we read upward-slanting lines as movement upward. Second, it sits on the part of the cheek that catches actual light when you walk outside, so the flush reads as something that happened in the cold air, not something painted on.
The three formulas to test it on
Three creams give you reliable feedback while you are training your hand.
Rare Beauty Soft Pinch Liquid Blush at $24 is the testing standard. The wand applicator deposits a controlled amount, the pigment is high enough to read on the first pass, and the formula sets to a powder-soft finish in about ninety seconds. Use the shade Joy, a cool pink, on first-tier skin tones, or Bliss, a warm rose, on deeper tones. Place two dots from the wand onto the cheekbone ridge directly, then tap out with your finger.
Westman Atelier Baby Cheeks Lip + Cheek Cream at $48 is the senior option. The wax structure is denser than Rare Beauty’s, which means it sits where you put it and barely migrates as the day warms up. Poppet, a clear true-pink, is the most universally flattering of the line. Warm the stick on the back of your hand first, then press onto the cheekbone with the bullet itself, then blend.
Saie Dew Blush at $25 is the lightweight option for warm weather and oilier skin. The formula is closer to a tint than a true cream, which means it sets fast and stains slightly. That makes it forgiving on long days, but unforgiving on placement. You have about thirty seconds to correct. Use it once you trust your placement, not while you are still learning it.
When the apple still works
For powder blush, the apple rule is not as wrong. Powder has no wax structure, sits more lightly on skin, and reads less geometrically. If you are dusting on a Nars Orgasm or a Milani Luminoso with a fluffy brush, the apple-and-up sweep that Bobbi Brown taught for decades still works because the diffusion is built into the pigment itself.
For draping, the Way Bandy technique from the 1970s that places blush from the apple to the temple and up onto the brow bone, the apple is a legitimate anchor. But draping is sculpting, not blushing. The intent is different.
The third honest exception is the boyfriend blush, the deliberately blotchy flush meant to mimic windburn. That look wants the colour high on the cheekbone and across the bridge of the nose, but irregularity is the goal. The smile-and-dot rule sometimes produces useful asymmetry there by accident.
Building a flush in three layers
The cheekbone-up rule works best as the second of three layers, not the only step.
Layer one is a stain. A jelly tint like Milk Cooling Water Jelly Tint at $24, or a fluid stain like Glossier Cloud Paint at $20, placed in a single dot mid-cheekbone and tapped out before it sets. This becomes the persistence layer. It will still be visible at 8pm.
Layer two is the cream itself, placed along the bone in the diagonal described above. This is the dimension layer.
Layer three is optional. A sheer powder blush in a coordinating tone, applied with a small fluffy brush only along the highest point of the cheekbone, locks the cream and adds a finishing diffusion. Use this only if you are heading into camera light or humidity above 60%.
For a five-minute morning, skip layers one and three. The cream alone, placed correctly, holds the cheek for a full working day. The point of training the placement is that the single-step version becomes good enough.
The bigger correction is mental, not muscular. Most of us learned blush from a generation of MUAs who were teaching for powder formulas, in a magazine era before cream became the dominant texture. The apple rule belongs to that era. Cream and liquid formulas, which now dominate the category, behave differently and want a different placement. Once you stop smiling at your mirror and start working with the bone you already have, the colour reads as lifted because, geometrically, it actually is.
A sunset blush gradient, peach at the apple and pink at the temple, is the next step once cheekbone-up placement is second nature. The gradient version is hard to execute on a smiled-up face. On a neutral one, it takes thirty seconds.
Frequently asked
Why does smiling and applying blush look wrong on me?
Smiling pushes your cheek tissue up and forward, then drops back when your face relaxes. The colour you placed on the lifted apple ends up sitting lower and closer to the nose, which reads as flushed-from-illness rather than flushed-from-a-walk. On rounder faces it also emphasizes width, since the colour clusters in the centre instead of carrying out along the bone.
Where exactly do you place cream blush for a lifted face?
Start a finger-width below the outer corner of your eye, sit the colour right on top of the cheekbone itself, and sweep toward your temple. The pigment should sit on the bony ridge, not below it. Imagine you are tracing the underside of a sunglass lens. That diagonal line lifts the face because it follows the natural up-and-outward slope of the bone.
Do you use fingers or a brush for cream blush?
Fingers are faster and warmer, which helps the emulsion blend. A small stippling brush gives you more pigment control if the formula is highly saturated. The hybrid that works for almost everyone is fingers to place, then a clean damp Beautyblender to diffuse the edges. Brushes alone tend to lay cream too sheer.
Continue reading
- technique Stained Blush Without the Blotch: Applying Watercolor Cheek Tints Liquid and water-gel blush goes patchy because of speed and prep, not the formula. Here is the small-area, damp-finger method that fixes the blotch for good.
- technique Puppy eyeliner: the downturned wing for rounder eyes Puppy liner drops the flick instead of lifting it, the opposite of a cat eye. Why the downturned wing flatters hooded and downturned eyes, and how to draw it.
- technique Eyeshadow by Eye Color: The Complementary Rule, Used Well The color wheel says wear the opposite of your eye color. That is true and incomplete. Here is why complementary shadow works, and the nuance for each eye.