Transitional blush: the Painted by Esther method, decoded
Ngozi Esther Edeme's under-eye-into-cheek blush is the year's most-copied technique. The secret is the concealer-mix step most tutorials skip.
Ngozi Esther Edeme, who posts as Painted by Esther, did Olandria’s makeup for the MACzine cover in April and the cheek placement broke containment. By May, every TikTok beauty account was attempting some version of it. By June, Patrick Ta had named a product after the technique and the comment sections had picked their side.
What’s happened underneath the discourse is a real shift in how blush sits on the face. For most of the last decade the rules were strict: apples for youth, cheekbone for lift, never, ever the under-eye. Edeme broke the last rule and the new rule is the gradient.
What the technique actually does
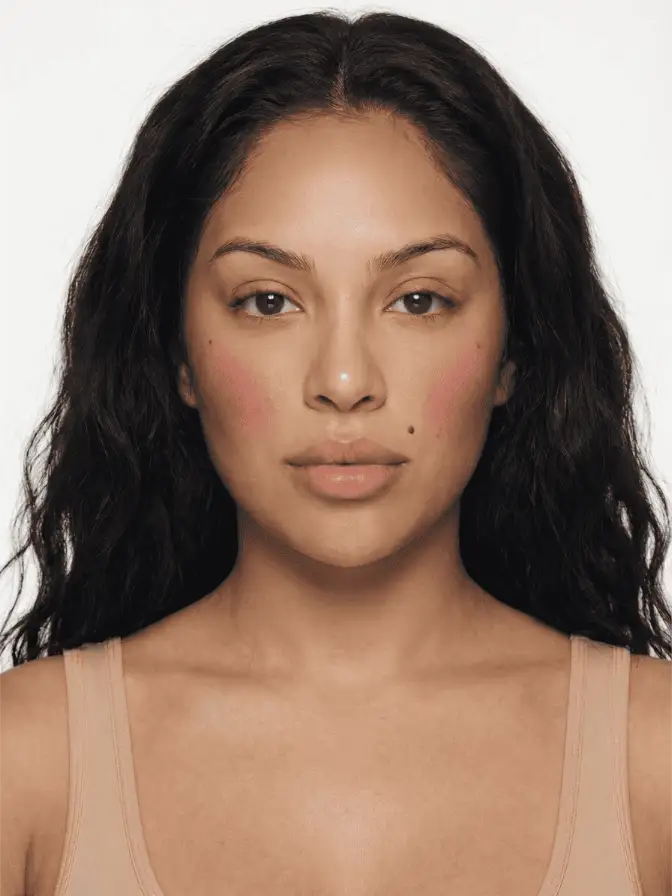
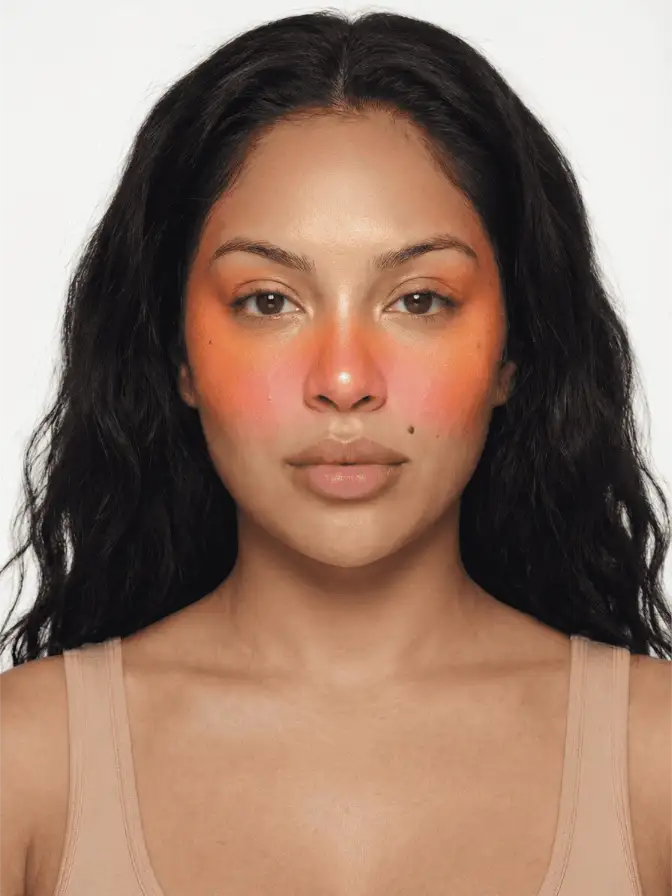
The placement is two zones, not one. A deeper cream blush, typically a cool-toned berry or warm terracotta depending on your undertone, is drawn high on the cheekbone and pulled back toward the temple. Then a lighter version of the same shade gets blended downward, under the outer eye, almost touching the lash line.
The lighter shade is the trick. It’s not a second product. Edeme mixes a pump of liquid concealer into the original blush on the back of her hand, which thins the pigment and warms it a half-step lighter. That diluted color is what touches the under-eye. The seamless wash between the deeper outer placement and the diluted inner placement is the whole effect.
Skip the mixing step and the result is what you’ve seen on every “I tried the viral transition blush” video that didn’t work: two distinct patches of color, a stripe of cheek, a separate stripe of under-eye, and a hard line in the middle that no amount of buffing fixes.
Why it photographs better than apples-of-cheeks blush
Traditional apples placement, the round dot of color on the front of the cheek, photographs flat. The face reads as a circle of red sitting on a wider, paler surface. Useful for the doll-faced coquette dollette tutorial, wrong for almost everything else.
The transition placement does two things at once. The deep color along the cheekbone catches the same highlight planes a contour would, so the face reads more sculpted under flash. The diluted color under the eye covers the slight blue-gray of thin skin without the deadening effect of a heavy concealer. The cheek and the under-eye start looking like one continuous surface instead of two separately powdered zones.
This is also why the technique caught on first among makeup artists working with rich complexions. The cooler undertone of under-eye skin on darker complexions reads as a different color from the cheek in standard placements; the transition gradient unifies it. Edeme’s work on Doechii and Kelly Rowland is the textbook before-and-after for what unified color does to face proportion.
How to actually do it
A working version, in order:
-
Finish base and concealer first. Set only the under-eye lightly, the rest of the face stays unpowdered so the cream blush has somewhere to grip. The no makeup makeup tutorial is the base I’d reach for here, not a heavy full-coverage one. You want skin that still has a slight tack.
-
Tap the deeper cream blush onto the back of your hand. Pick it up with a small fluffy brush or your ring finger and stipple it along the upper cheekbone, starting roughly under the outer edge of the iris and pulling back toward the temple in a slight upward arc. Don’t smear, stipple.
-
Add a single pump of liquid concealer (matched to your skin tone, not lighter) to what’s left of the blush on your hand. Mix until the color goes one or two shades softer. This is the transition shade.
-
Pick up the transition shade and place it just under the eye, starting under the outer corner and feathering it inward toward where the dark circle ends. Some artists feather it all the way to the inner corner; for daytime, stopping at the pupil line is enough.
-
Blend the two together at the boundary using a clean dense brush or the same finger, working in tiny circles. The seam between deep and light should disappear.
-
Optional, and what most tutorials miss: a third layer of the deepest blush, the tiniest bit, dotted right on the apex of the cheekbone. This recreates the dimensional pop a contour would give without adding more product to the lower face.
The whole sequence takes about three minutes once you’ve done it twice. The Rare Beauty Liquid Blush in Hope or Bliss, the Westman Atelier Baby Cheeks in Petal, and the MAC Glow Play Blush in Heat Index are the products I’ve watched work most consistently across complexions; what they share is enough pigment to survive the concealer dilution step.
If you want to push it further toward the sunset blush placement Edeme also popularized, add a coral or peachy lighter version of the transition shade as a fourth layer across the nose bridge. The result is closer to a thermal map of warmth on the face, which is the editorial direction this technique was heading even before MAC picked it up.
Where the discourse went wrong
The argument over whether Patrick Ta’s Major Headlines Transition Blush “stole” the technique misses the more useful question, which is what the technique replaces. Transition blush is not an alternative to draping. It’s an alternative to under-eye concealer brightening.
For about ten years the dominant under-eye move was the inverted triangle of pale concealer, set with translucent powder, designed to bounce light off the lower cheek. The technique was useful in low-resolution video and brutal in person, where it tended to read as a bright patch detached from the rest of the complexion. Transition blush does the brightening with warmth instead of paleness, which reads as “rested” rather than “concealed.” That’s why it’s spreading; not because Edeme owns the idea but because the idea solves a problem the industry has been working on since the strawberry girl blush flush went mainstream in 2023.
The Painted by Esther signature is the high arc and the gradient down. The Patrick Ta product is, fairly, a tool that makes the gradient easier. Both versions outperform a swiped stripe of powder blush on every metric that matters to the people actually wearing it.
According to MAC Cosmetics’ own breakdown on the MACzine launch, Edeme’s process starts with the deeper shade first, not the lighter, and that order matters. The deep color sets the boundary of where the gradient can stretch; the diluted shade fills in within those edges. Working in reverse, the way most copycat tutorials do, gives you a vague pink wash with no contoured structure.
Try it once with the concealer-mix step included and the difference is visible in about thirty seconds.
Frequently asked
What is transitional blush?
It's a two-tone blush placement where a deeper shade sits high on the cheekbone and outer cheek, then a lighter version of the same shade (the original blush thinned with concealer) is blended down toward the under-eye. The transition between the two reads as a soft gradient, not a stripe.
Does transitional blush work on every skin tone?
Yes, but the pigment load matters more than the shade name. On deeper complexions you want a true cream or liquid with real saturation, like MAC Glow Play in Heat Index or Rare Beauty Soft Pinch in Hope. On fair skin a sheer formula like Westman Atelier Baby Cheeks looks closer to a flush than a paint.
Do I need cream blush or can I use powder?
Cream or liquid is the point. Powder skips on top of concealer rather than melting into it, so the gradient never softens properly. If you only own powder, dampen a sponge and stipple lightly, then top with a touch of liquid highlight to fake the diffusion.
Continue reading
- technique Stained Blush Without the Blotch: Applying Watercolor Cheek Tints Liquid and water-gel blush goes patchy because of speed and prep, not the formula. Here is the small-area, damp-finger method that fixes the blotch for good.
- technique Puppy eyeliner: the downturned wing for rounder eyes Puppy liner drops the flick instead of lifting it, the opposite of a cat eye. Why the downturned wing flatters hooded and downturned eyes, and how to draw it.
- technique Eyeshadow by Eye Color: The Complementary Rule, Used Well The color wheel says wear the opposite of your eye color. That is true and incomplete. Here is why complementary shadow works, and the nuance for each eye.