Where to put a floating crease, by eye shape
The floating crease lives or dies by where you place it. A field guide to the right placement on almond, hooded, monolid, and downturned eyes.
The floating crease is one of the more punishing techniques to get wrong. A line that sits a few millimeters too low disappears the moment the eye opens. A line that sits a few millimeters too high looks like a separate piece of liner trying to be a brow. It is a technique with a narrow margin, and the margin shifts by face.
Most tutorials I’ve seen treat the floating crease as a single placement with a single technique. It isn’t. The right line lives in a different spot on an almond eye than on a hooded one, and the difference is bigger than you would think.
What the floating crease is, structurally
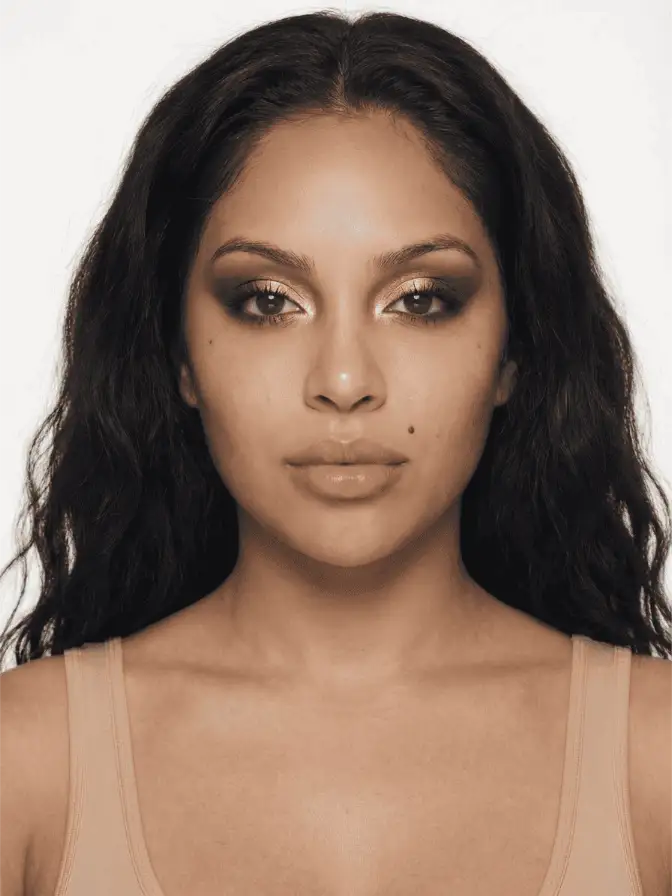
In a traditional smoky eye, the shadow follows the natural socket. Color blends into the crease and out into the brow bone, with no visible line of demarcation. The floating crease inverts this. According to L’Oréal Paris’s breakdown, it draws “an arc just beyond your natural crease,” leaving the lid below it bare. The lid stays clean. The line floats in a space the natural anatomy does not define.
The reason it photographs well is geometric. By introducing a line where the eye does not have one, you create a second curve. The brow is one arc. The lash line is another. The floating crease drops a third in between. The eye reads as larger, more sculpted, more deliberate. When it works.
Almond eyes: stay close to the natural crease
Almond eyes have a visible socket and a balanced lid-to-brow-bone ratio. The floating crease sits right at the edge of the natural crease, or one to two millimeters above it. This is the easiest shape to work with because the underlying anatomy already holds the line in place.
Use a small flat brush, not a fluffy blender. Trace the arc starting from the outer corner, sweep inward to about the midpoint of the eye, and let it taper. The line does not need to extend past the inner third of the lid. The trick is keeping the lid below it visibly bare; if you blend the line down toward the lash, you have a smoky eye, not a floating crease. The slaye floating crease tutorial covers the basic version of this on an almond shape.
Hooded eyes: lift it 3 to 5 millimeters higher
Hooded eyes are the technique’s hardest case. The hood, the fold of skin between the brow bone and the lid, covers the natural crease when the eye is open. Place a line on the natural crease and the eye will simply hide it. Open. Closed. Both look identical, because the line never makes it past the hood.
The fix is to place the line where it will be visible while the eye is open, not while it’s closed. Charlotta Eve’s hooded-eye guide calls this the “visible eyeshadow rule,” and the practical translation is roughly 3 to 5 millimeters above where the natural crease falls when the eye is shut. You’ll feel like you’re putting the line on the brow bone. That feeling is correct. When the eye opens, the hood drops over the natural crease, and the floating line lands exactly where a non-hooded eye’s natural crease sits.
A useful test: open the eye, look forward in a mirror, and trace the line at the height where you want it to read. Then close gently and check whether it ended up on what feels like brow-bone territory. If it did, you’re correct. If the line ended up on the natural crease, drop your hand by another two millimeters next time.
Monolid eyes: build a second curve in the air
Monolid eyes do not have a fold at all. There’s no natural crease to relate the line to, which is sometimes described as making the technique impossible. It is not. It just changes the reference point. Without a crease, the line is referenced to the lash line below and the brow above.
A clean placement on a monolid sits roughly 8 to 10 millimeters above the lash, depending on lid height. The line should curve gently rather than running straight, mimicking the arc a crease would make if there were one. This is also the only eye shape where a halo-eye style placement, with a brighter color in the center of the lid, plays especially well; the halo eye tutorial is built around exactly this geometry.
What you avoid: a line that runs parallel to the lash. Parallel lines flatten the eye. The arc, even a subtle one, lifts.
Downturned eyes: angle the outer end up
Downturned eyes have a slight downward tilt at the outer corner. A horizontal floating crease on this shape can amplify the downturn rather than counter it. The fix is small but matters: angle the outer end of the line up by 5 to 10 degrees, so the line ends slightly higher than it begins.
This is the same correction principle behind the cat eye, just applied to a different feature. The slaye cut crease tutorial demonstrates a related correction for a different technique, and the geometry transfers cleanly.
Color choice and brush density
A common beginner failure is reaching for cobalt blue or saturated emerald the first time. According to the L’Oréal tutorial, brown is the recommended starter color, specifically a medium-warm brown. The reason is forgiving error. A brown floating line that sits one millimeter off looks like a soft socket shadow and reads fine. A cobalt line that sits one millimeter off looks like a mistake.
Brush choice matters as much as color. A small flat brush gives a defined edge. A fluffy blender will pull the color down into the lid and break the floating effect. If you want a softer line, draw it with a flat brush first and then use a clean blender to lightly diffuse only the upper edge, never the lower. The lower edge is what defines the float.
A note on density
The floating crease wants medium density, not full opacity. A line that’s too dense reads as eyeliner displaced; a line that’s too sheer disappears in photographs. The sweet spot is the density of a soft eyeshadow worked in twice. Build, don’t dump. Two passes with a half-loaded brush beats one pass with a fully loaded one every time.
The technique rewards patience and punishes guesswork. If you’ve tried it once and it disappeared on you, the chances are very high that the line was placed for a different eye shape than the one looking back in the mirror.
Frequently asked
How high should a floating crease sit on hooded eyes?
On hooded eyes, the line needs to sit roughly 3 to 5 millimeters above the natural crease while the eye is open. If you place it on the natural crease, the hood will swallow the line the moment you blink. Charlotta Eve calls this the 'visible eyeshadow rule' for hooded shapes.
Does a floating crease work on monolid eyes?
Yes, but the placement is different. On monolids the line should sit roughly 8 to 10 millimeters above the lash line, where it stays visible without competing with the brow. The eye reads as having a sculpted second curve rather than a fold.
What color works best for a beginner floating crease?
A medium-warm brown reads softer than a cool grey or black. L'Oréal Paris's tutorial specifically recommends a brown for a neutral floating crease and saves cobalt or saturated color for more advanced wear.
Continue reading
- technique Stained Blush Without the Blotch: Applying Watercolor Cheek Tints Liquid and water-gel blush goes patchy because of speed and prep, not the formula. Here is the small-area, damp-finger method that fixes the blotch for good.
- technique Puppy eyeliner: the downturned wing for rounder eyes Puppy liner drops the flick instead of lifting it, the opposite of a cat eye. Why the downturned wing flatters hooded and downturned eyes, and how to draw it.
- technique Eyeshadow by Eye Color: The Complementary Rule, Used Well The color wheel says wear the opposite of your eye color. That is true and incomplete. Here is why complementary shadow works, and the nuance for each eye.